French-braiding someone else's hair isn't too hard. We all learned at slumber parties and summer camp. But French braiding your own hair? That's something else altogether. You have to reach behind your head and do everything backwards, with nothing but a mental picture in your mind of what you're actually doing. But you shouldn't have to call your BFF over to your house every time you want that hairstyle. You can do it yourself — we promise. Here's how to French braid your own hair.
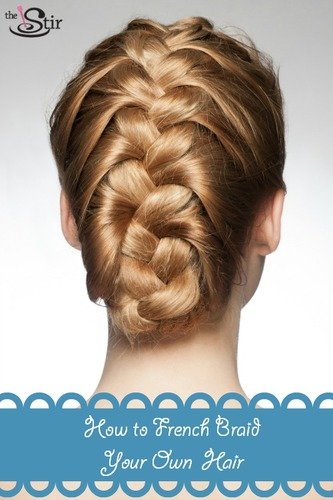
This video tutorial by Luxy Hair makes this 'do super simple. Follow our slideshow to see it broken down into steps.
Embedded content: https://www.youtube.com/watch?v=7yDEqP6FsQs
*Images ©iStock.com/SweetyMommy (top) and *©iStock.com/malyugin (bottom)
Comb or Brush Your Hair Back

Start by combing or brushing your hair back. If you have slippery hair that doesn't like to stay put, I recommend either spraying your hair damp or running some gel or mousse into your hair before you get started.
Pull Back Front Section

Gather the front section of your hair together in one hand. Make sure you've gathered an even amount of hair from each side. Try to start as near the top of your head as possible. Once you get comfortable, you can experiment with starting a braid lower down on your head.
Divide Into Thirds

Divide into three sections of equal thickness. Hold each section between fingers and thumb in one hand.
Pull 1 Side Over & Down the Center

Take the left-hand section and pull it to the right. Then pull it down the center so it's now the middle section. Hold tight again with one hand.
It doesn't matter which side you start with as long as you alternate consistently.
More from The Stir: 8 Beauty 'Gimmicks' That Actually Work
Pull the Other Side Over & Down the Center

Now do the same with the right side. Pull this section over, then down to the center. This is the new middle section.
If you're already familiar with braiding this should feel very familiar.
Finger Comb Out a New Section From One Side

Okay, now we're going to start adding more hair to this braid as you work your way down. Finger-comb a small section of hair from one side. You'll want to make sure it's a pretty thin section.
Join With Braided Section

Join that new section of hair with the nearest braided segment on the same side.
Pull Combined Section Over & Down the Center

Now braid that new, doubled section in the same way you've been doing, but pulling it over and down the center to make it the new middle section.
More from The Stir: 14 Celebs Who Went Gray on Purpose & Look Amazing (PHOTOS)
Repeat on the Other Side

Repeat that process on the other side. Finger comb a thin section, add that hair to the segment of hair on that side, pull over and down the center.
Keep Braiding, Alternating Sides

Keep braiding like this, incorporating more hair, thin section by thin section, alternating sides, until you reach the base of your skull.
Finish Braid

From there, just braid your hair out and secure with an elastic. You'll want to braid as tightly as possible the entire way, but especially here at the end where those wispy strands tend to fall out. Spray all around, and smooth back the front. Enjoy your fresh braid!
More from The Stir: We Tried It: The 'Plopping' Hair Trick for Perfect Curls