Today I'm excited to share designer Martha McQuade's tutorial for a DIY felt wall planter. Martha is a Minneapolis-based architect and designer and an adjunct assistant professor at the University of Minnesota's College of Design. After feeling inspired by the many vertical gardens she's seen, she decided to create her own felt wall planter. This is such a beautiful way to add some 3-D interest and color to an outdoor patio area. Check out her full tutorial with photos from McQuade herself.
Materials List
- 24×48 plywood 1/2-inch thick
- Exterior latex paint
- Paintbrush
- 3 pieces of craft felt 18×54 each
- Staple gun
- 3/8" staples
- Drill
- 1-1/4" long screws
- Potting mix
- Plants
I've admired vertical growing walls for a long time and wanted to try making my own version to use as a seasonal planter here in Minnesota. My version uses a plywood back so that I can easily remove the planter to store it during the winter.
-
Paint both sides and all edges of the plywood to protect it from moisture.
-
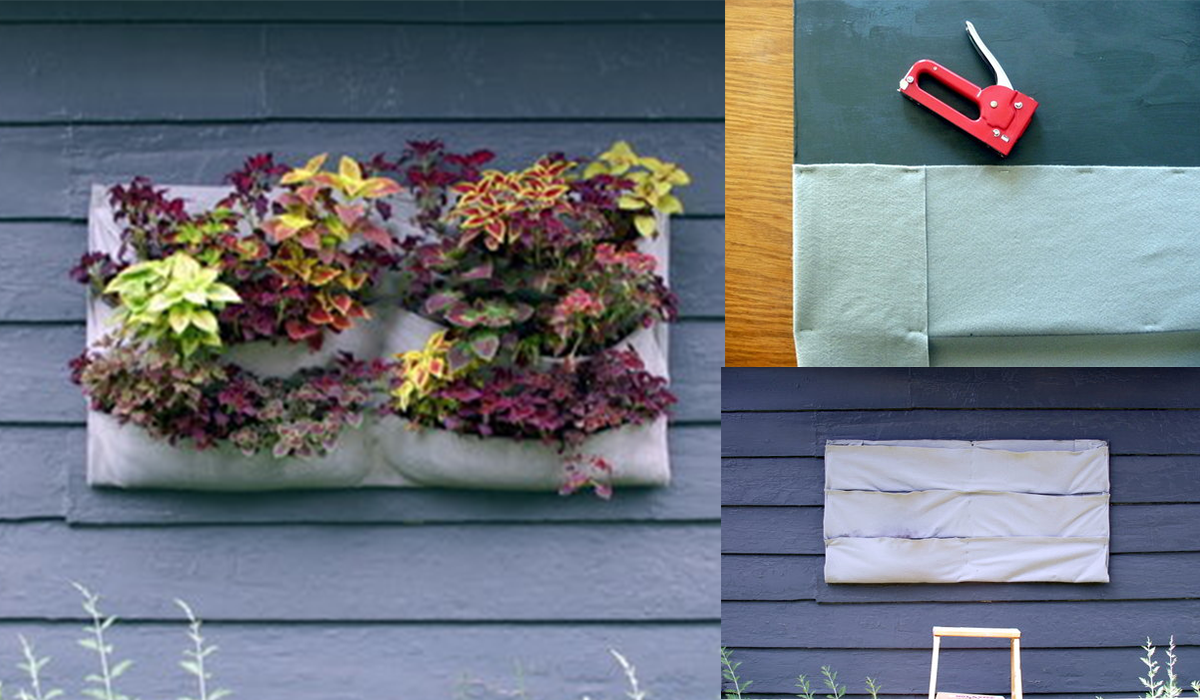
Draw two lines horizontally across the plywood at 6-inch intervals to use as guides for placing the pockets.

- Starting with the bottom pocket, staple one long edge of a piece of felt along the bottom line, folding in the three inches of overlap on the left and right sides. Staple the felt a few times along the bottom edge as well.

-
Fold up the felt horizontally to form a pocket. At each vertical edge, angle the excess felt out slightly. This will provide a little room in the pocket at the edge. Staple along the vertical edge on the inside of the pocket.
-
Repeat with the middle and top pockets.
-
Add a few staples vertically at the midpoint of each pocket to prevent sagging.

-
Attach plywood to the wall. I screwed the planter directly to the exterior wall using construction screws. You could also drill a hole in each top corner and hang it with some chain from large eye screws.
-
Fill the pockets about 3/4 full with light potting mix. Arrange plants in the pockets, allowing some room for growth, and fill in with more soil, tucking in the front edge of the felt to make a neat edge. The top of the soil should be an inch or so below the top edge of the felt to prevent the soil from spilling over.
A few notes …
I used a light gray felt because I had some on hand. A darker color will blend in more and hide dirt smudges in the beginning until the plants fill in to cover the felt. When I was finished, I sprayed the whole thing with the hose to clean up all the spilled dirt.
The felt planters you see on the market are made with heavy industrial wool felt. This type of felt is thicker so it doesn't require the plywood backing. It is also much more expensive. I used thin craft felt to make this more affordable.
The plants I used are Coleus, which I like because of the variety of texture, leaf shape, and color. I used 13 varieties. These aren't necessarily hanging/trailing plants, but they will hang a bit and fill out to hide the felt. The image at the top shows the plants a few days after I planted them. The idea is that eventually you won't see the "planter" at all.